RexCore (REXYGEN runtime core) Installation
User guide
2025-07-04
Plzeň (Pilsen), Czech Republic
Contents
1.1 Supported platforms and devices
2 Installation using an operating system image
2.1 WAGO PFC100/200
2.2 Monarco HAT
2.3 Unipi Axon/Patron and REX M527
2.4 App on Weidmüller u-OS PLC (WL2000, M3000, M4000)
3 Bootstrapping from REXYGEN Studio
3.1 Quick bootstrapping
3.2 Full installation
3.3 Uninstall/Modify installation
4 Manual installation on Debian, Raspberry OS or Ubuntu
5 Using the static binary file
6 Starting the runtime
Chapter 1
Introduction
This guide provides information on installing and running runtime modules of the REXYGEN system on various platforms. You should have an understanding of the basic components of the REXYGEN system and have the development tools installed. If not, please refer to the previous manual [1]. The installation of RexCore on your target platform can be done using:
- pre-installed operating system image,
- REXYGEN Studio by connecting to the target device via SSH,
- manual installation,
- downloading a static library for the specific platform.
If a pre-installed image is available for the device, it is recommended to use this installation method. Regardless of the installation method you choose, you will need to license the device according to the instructions in the user manual [2].
1.1 Supported platforms and devices
RexCore (REXYGEN runtime core) is currently actively supported and tested on:
- Windows 10/11- 64 bit,
- Linux (with RT_PREEMPT for real-time performance),
- Debian Bullseye and Bookworm on amd64, arm64, armhf,
- Raspberry Pi OS (Bullseye and Bookworm) on Raspberry Pi 3B+, 4, 5,
- Ubuntu 22.04 and 24.04 on amd64, arm64, armhf,
- REX M527,
- Monarco HAT,
- AIC platform,
- Unipi PLC (Neuron, Patron and Iris),
- Weidmüller u-OS PLC (WL2000, M3000, M4000).
Furthermore, RexCore can be installed on other platforms that are currently not tested, such as WAGO PFC, Pigeon PLC or Unipi 1.1. In this case, contact our technical support for more information.
Chapter 2
Installation using an operating system image
An operating system image with RexCore and other recommended packages preinstalled is available for some platforms. If your platform is not listed in the following sections, please use another installation method.
IMPORTANT: Uploading a new image to the device will erase all original data and settings. Make sure you have all the necessary files stored elsewhere!
2.1 WAGO PFC100/200
- It is highly recommended to use the official REXYGEN OS image for WAGO
PFC100/200 which you can download from
https://download.rexcontrols.cz/partner/daily/rexygen/wago/ - After you download the file, write it to an SD card with a capacity of 2 GB or
more. You can use a Win32 Disk Imager for example:
https://sourceforge.net/projects/win32diskimager/. - Afterwards insert the micro SD card into your WAGO PFC100/200 and power-up the device. By default, WAGO PLCs boot from SD card if present. So the new operating system is immediately started. The image already contains all the runtime modules of the REXYGEN system.
- Connect to the WAGO web configuration interface on address
http://device-IP-address/wbm (use the IP address of your device).
Click on the "login" link, the default account is "root" and password "wago". - Go to Administration -> Create Image to transfer the operating system image to the internal storage.
- Press the Start Copy button and save the current configuration.
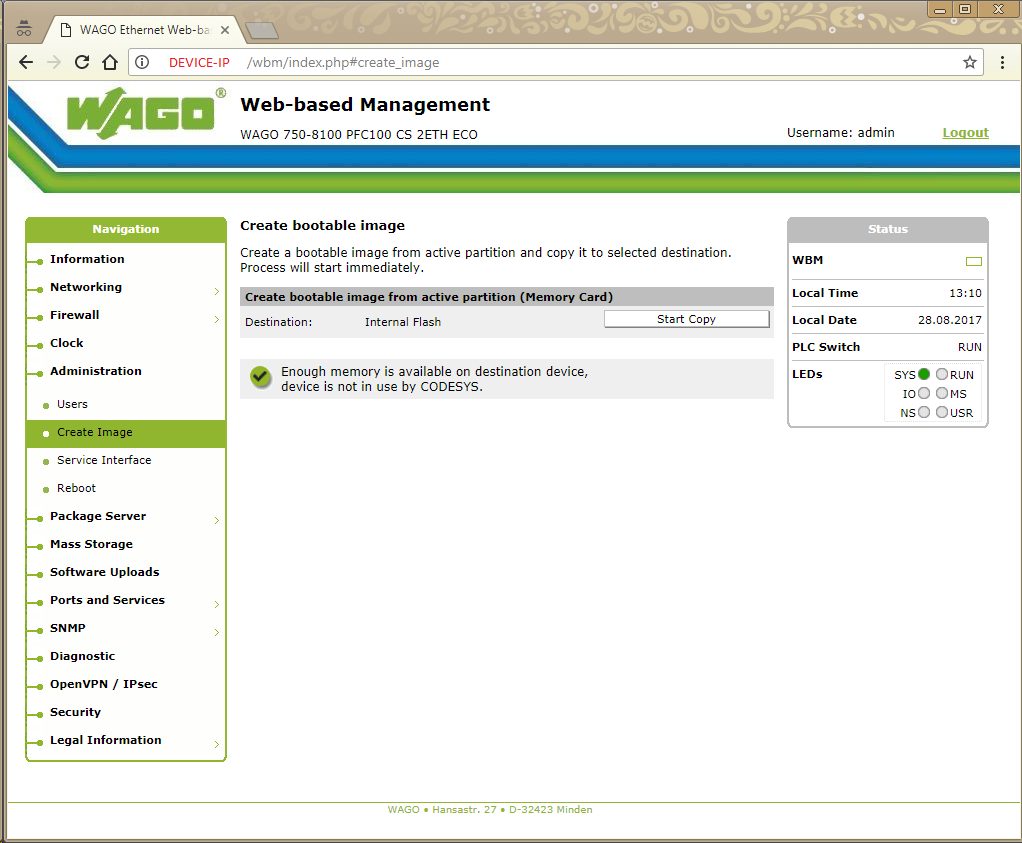
- Power-off the Wago PLC, remove the SD card and power it on again.
2.2 Monarco HAT
- Image with preinstalled OS and RexCore can be downloaded from
https://www.rexygen.com/downloads/rexygen/monarcohat/. - After downloading the file, unzip it and write the obtained img file to an SD card
with a capacity of at least 4 GB. For example, you can use Win32 Disk Imager:
https://sourceforge.net/projects/win32diskimager/. - Put the SD card in and power up your Monarco HAT.
- After operating system expansion (which is done automatically with the first boot), you can log in via SSH with name rexygen and password rexygen. Please change the password using raspi-config or passwd as soon as possible.
2.3 Unipi Axon/Patron and REX M527
- Image with preinstalled OS and RexCore can be downloaded from
http://download.rexcontrols.com/rexygen/unipi-patron/. There are available following images:- runtime – with RexCore only,
- dwm – with RexCore a REXYGEN DWM,
- full – with RexCore, REXYGEN DWM and REXYGEN Studio.
- After you download the file, flash the Operating System using the service interface
according to this manual:
https://kb.unipi.technology/en:hw:007-patron:image\#flash_backup_the_os. - The SSH is enabled by default. The username is: rexygen and the password is: rexygen. Please change the password using passwd as soon as possible. The root login via SSH is disabled by default.
2.4 App on Weidmüller u-OS PLC (WL2000, M3000, M4000)
There is no complete OS image ready for the Weidmüller u-OS PLC, but RexCore can be easily installed using the u-OS control center as an application.
- Open the u-OS Control Center of your target device by going to the IP address of your platform through a web browser and login using your username and password. The default username is admin and the default password is Detmold.
- On the panel on the left, go to Apps/App manager.
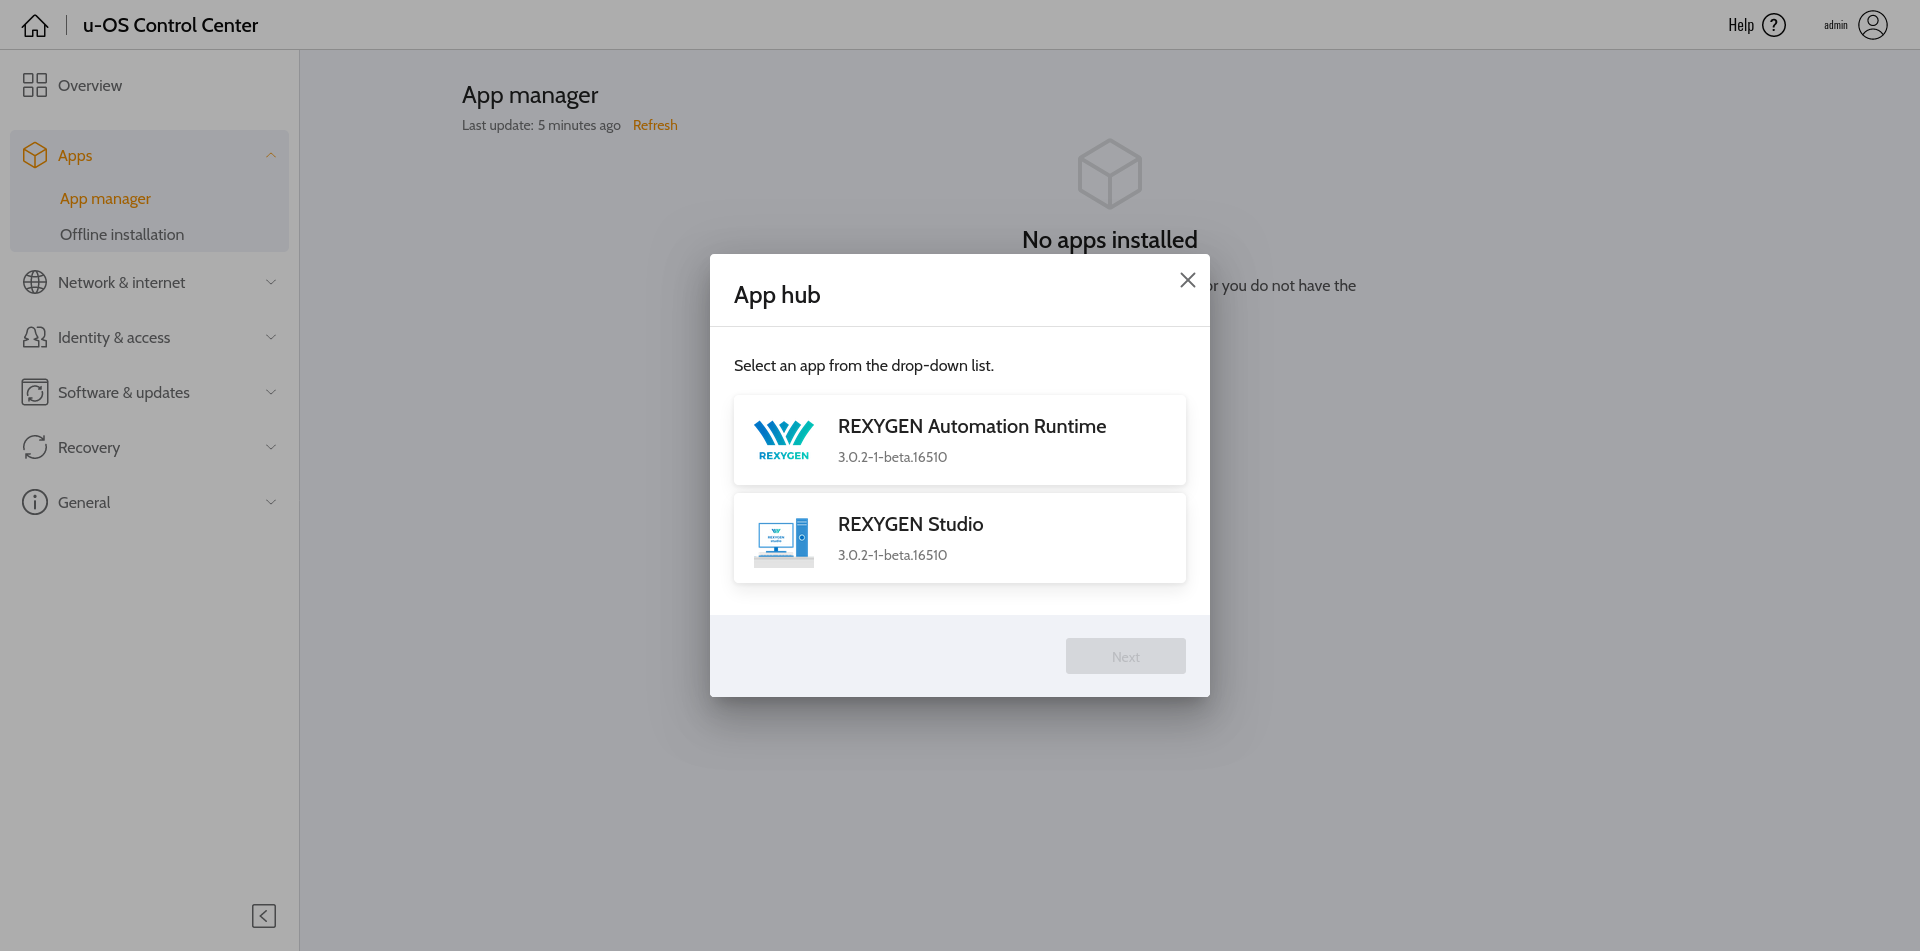
- Select RexCore runtime.
- From the drop-down menu, select the version of RexCore you want to install and click on Next.
- Click on Install and wait for RexCore to finish installation.
Chapter 3
Bootstrapping from REXYGEN Studio
RexCore can also be installed on the target device directly from REXYGEN Studio using SSH. This feature is available in REXYGEN Studio for Windows, Linux, and AppImage. Bootstrapping can be done either using static binary files prepared for supported architectures or using apt packages for Debian, Raspberry OS, or Ubuntu. An installation wizard is provided for both options, as described in the following sections.
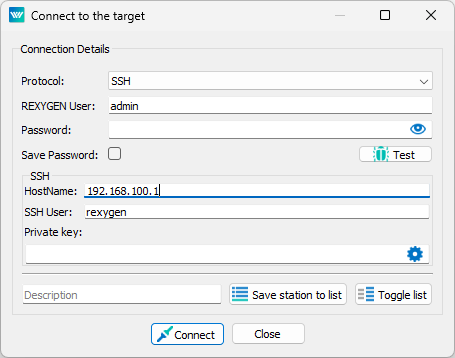
The beginning of the procedure is the same for both variants. First of all, install the OS according to the manufacturer’s instructions and make sure you have SSH enabled on the target device. After opening the connection dialog (Target->Connect), select the SSH protocol from the menu. Enter your device’s address in the HostName field and your SSH user name in the SSH User field. Leave the other fields set to their default values and press the Connect button.
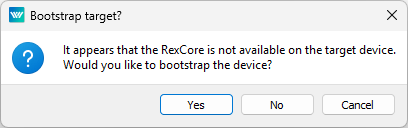
After entering the password, a message will appear indicating that RexCore is not installed on the target device and offering the option to install it. Press the Yes button.
In the next window, choose whether to install RexCore using static binary files (Quick bootstrapping) or using apt packages (Full installation). If you switch to the Status tab, you will see information about the target device.
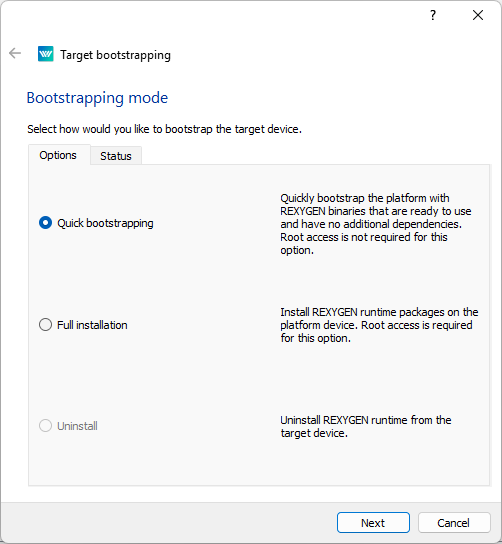
3.1 Quick bootstrapping
This option (installation using static binary files) is intended for the x86_64, i686, aarch64, and armhf architectures. The binary file is uploaded to the target device from the REXYGEN Studio installation on the development computer. Therefore, no internet connection is required. This installation method does not support the following modules: PythonBlk, FMIBlk, DbDrv.
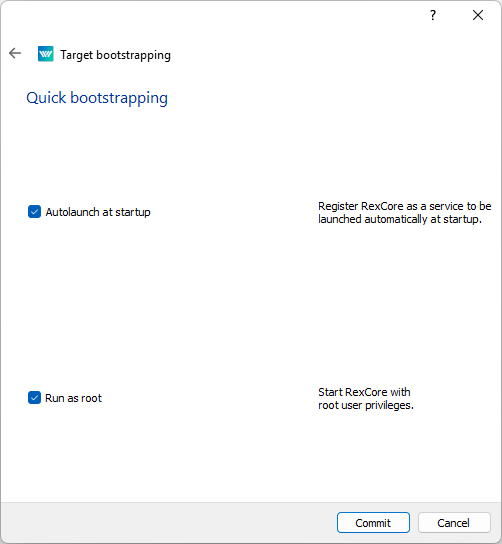
After selecting this option in the procedure mentioned above, you can specify whether RexCore should start automatically when the device boots and whether it should run with root privileges. We recommend checking both options. After pressing the Commit button, the installation will begin.
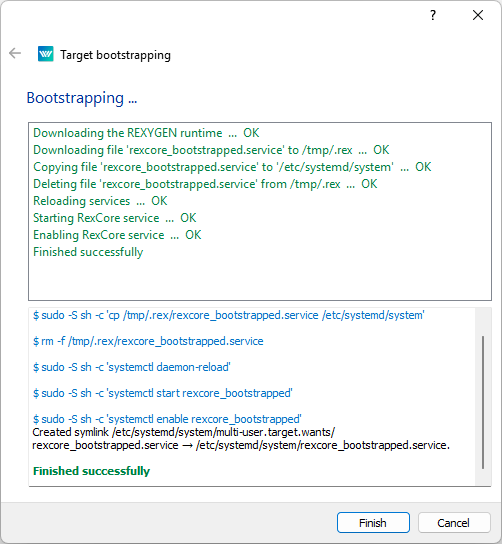
If everything is successful, a message will appear indicating that the installation was completed successfully. The runtime runs within the logged-in user’s environment, and the runtime folder is located in ˜/.rex.
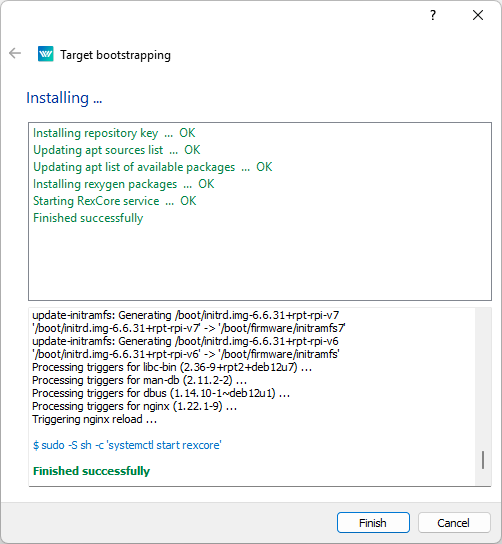
3.2 Full installation
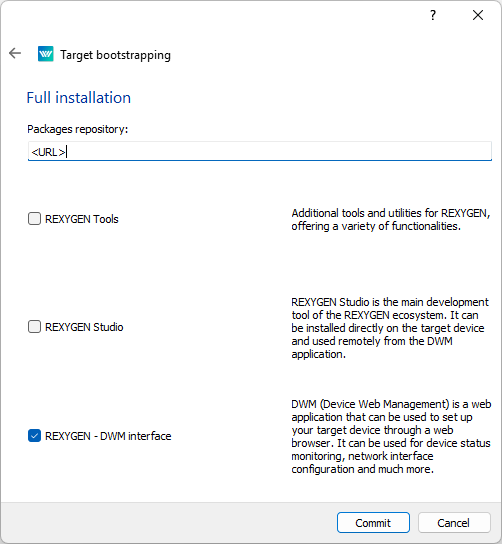
This option (installation using apt packages) is intended for Debian, Raspberry OS, and Ubuntu. After selecting this option in the procedure described at the beginning of the chapter, leave the default address of the remote repository from which the packages will be downloaded and select any additional packages you want to install alongside RexCore.
Press the Commit button to start the installation. After completion, a message will appear indicating whether the installation was successful.
3.3 Uninstall/Modify installation
If you are connected to the target device via SSH, you can also uninstall or modify the RexCoreinstallation. You will find this option in Menu -> Target -> Uninstall/Modify installation.
Chapter 4
Manual installation on Debian, Raspberry OS or Ubuntu
The following instructions will guide you through installing the RexCore on a pure Debian, Raspberry OS, or Ubuntu machine. First of all, install the OS according to the manufacturer’s instructions and make sure you have SSH enabled on the target device.
- Add REXYGEN public key:
sudo wget https://download.rexcontrols.com/rexygen.gpg -O /etc/apt/trusted.gpg.d/rexygen.gpg
- Create a new rexygen-release.list file in the /etc/apt/sources.list.d/ directory
using the command according to the target device:
Debian Bookworm:echo 'deb https://download.rexcontrols.com/rexygen/debian/ bookworm rexygen dwm'|\ sudo tee -a /etc/apt/sources.list.d/rexygen-release.list
Debian Bullseye:
echo 'deb https://download.rexcontrols.com/rexygen/debian/ bullseye rexygen dwm'|\
sudo tee -a /etc/apt/sources.list.d/rexygen-release.list
Ubuntu 22.04 Jammy Jellyfish:
echo 'deb https://download.rexcontrols.com/rexygen/ubuntu/ jammy rexygen'|\
sudo tee -a /etc/apt/sources.list.d/rexygen-release.list
Ubuntu 24.04 Noble Numbat:
echo 'deb https://download.rexcontrols.com/rexygen/ubuntu/ noble rexygen'|\
sudo tee -a /etc/apt/sources.list.d/rexygen-release.list
- Update package list:
sudo apt update
- Install RexCore (REXYGEN runtime core):
sudo apt install rexygen-runtime
- The repository contains several other packages that can be installed on a platform such
as REXYGEN DWM [3], REXYGEN Studio allowing editing projects directly on
the target device [4]. Or REXYGEN Tools containing REXYGEN Compiler,
RexArc and more. Packages can be installed using the following commands:
sudo apt install rexygen-dwm
sudo apt install rexygen-studio
sudo apt install rexygen-tools
Complete installation can be done using:
sudo apt install rexygen
Chapter 5
Using the static binary file
RexCore can also be installed in the form of static binary files directly from the command line. The same rules apply as for Quick bootstrapping in REXYGEN Studio (see Chapter 3). To install, use the following commands:
wget https://download.rexcontrols.com/partner/daily/rexygen/static/$(uname -m)/RexCore -O RexCore
chmod +x RexCore
./RexCore -l -u -t <apikey>
where -l enables login to the console, -u uses /.rex as the main runtime folder (instead of /rex), and -t attempts to obtain a dynamic license. You can obtain the license on the licensing server. All RexCore parameters are optional.
Removing the binary files can be done using the following commands:
rm -f RexCore
rm -rf ~/.rex
Chapter 6
Starting the runtime
Immediately after installation, it is necessary to license the target device using one of the methods described in the manual [2]. The RexCore runtime module will be automatically started in the background as a daemon once licensed, and it will be possible to establish a connection between the host PC and the platform using the REXYGEN Studio program. RexCore will also start automatically after a (re)boot of the system (This may not be true if you used Quick bootstrapping as the installation method and did not check the Autolaunch at startup option). Please refer to the RexCore user guide [5] for detailed information about the files and folders of the REXYGEN system runtime modules.
Bibliography
[1] REX Controls s.r.o.. Getting started with REXYGEN, 2024. .
[2] REX Controls s.r.o.. REXYGEN Licensing – User guide, 2024. .
[3] REX Controls s.r.o.. REXYGEN DWM – User guide, 2024. .
[4] REX Controls s.r.o.. REXYGEN Studio – User manual, 2024. .
Documentation reference number: 17331
2025 © REX Controls s.r.o., www.rexygen.com