REXYGEN DWM
User guide
2025-07-04
Plzeň (Pilsen), Czech Republic
Contents
2 Installation
3 Default settings of REXYGEN DWM
3.1 Resources
3.2 System Info
3.3 Service
3.4 Network
3.5 Hostname
3.6 Date and Time
3.7 Security
3.8 File Browser
3.9 HMI
3.10 Logs
3.11 Password
3.12 Archives
3.13 Licensing
4 REXYGEN DWM Configuration
4.1 Menu Configuration
4.1.1 General parameters
4.1.2 Parameters for specific classes
4.1.3 Possible queryParams for specific classes
4.2 Integration of HMI pages
5 Access Rights Settings
Chapter 1
Introduction
The DWM abbreviation stands for Device Web Management and it is a supplementary web application for REXYGEN-powered devices. The application lets user to setup a handful of various features whose configuration would otherwise be accessible only through the command line interface of the underlying operating system. REXYGEN DWM with the default settings is shown in Figure 1.1.
The navigation menu is fully configurable and can respect specific permissions given to REXYGEN Users.
Chapter 2
Installation
This Chapter describes the steps to install and uninstall the REXYGEN DWM application in the Debian GNU/Linux. Please note, that the REXYGEN DWM is an additional software to the RexCore and therefore it is necessary to install the RexCore on your device first. If you don’t have installed RexCore on your device, follow the corresponding manual from Support -> Documentation and manuals at [1].
For installation follow this steps:
- Add REXYGEN public key in case you don’t have it stored from RexCore installation
process:
sudo wget https://download.rexcontrols.com/files/key/rex-debian-key.pub.gpg -O /etc/apt/trusted.gpg.d/rexygen.gpg
- Add REXYGEN DWM repository to your sources list:
sudo echo ’deb https://download.rexcontrols.com/rexygen/debian/ bookworm rexygen dwm’ | \
sudo tee -a /etc/apt/sources.list.d/rexygen.list
- Update package list:
sudo apt update
- Install REXYGEN DWM:
sudo apt install rexygen-dwm
- If you want to explore Archives, install the RexArc utility:
sudo apt install rexarc
Use the following commands to remove REXYGEN DWM from the operating system:
sudo apt autoremove
Chapter 3
Default settings of REXYGEN DWM
After successful installation, REXYGEN DWM should be accessible on address
http://device-IP-address/dwm (use the IP of your device). If everything went well, you
should see the environment from the Figure 1.1. The environment is divided into several
sections (screens) which are described bellow. This pre-defined menu can be configured if
needed. See the Chapter 4.2 for more details.
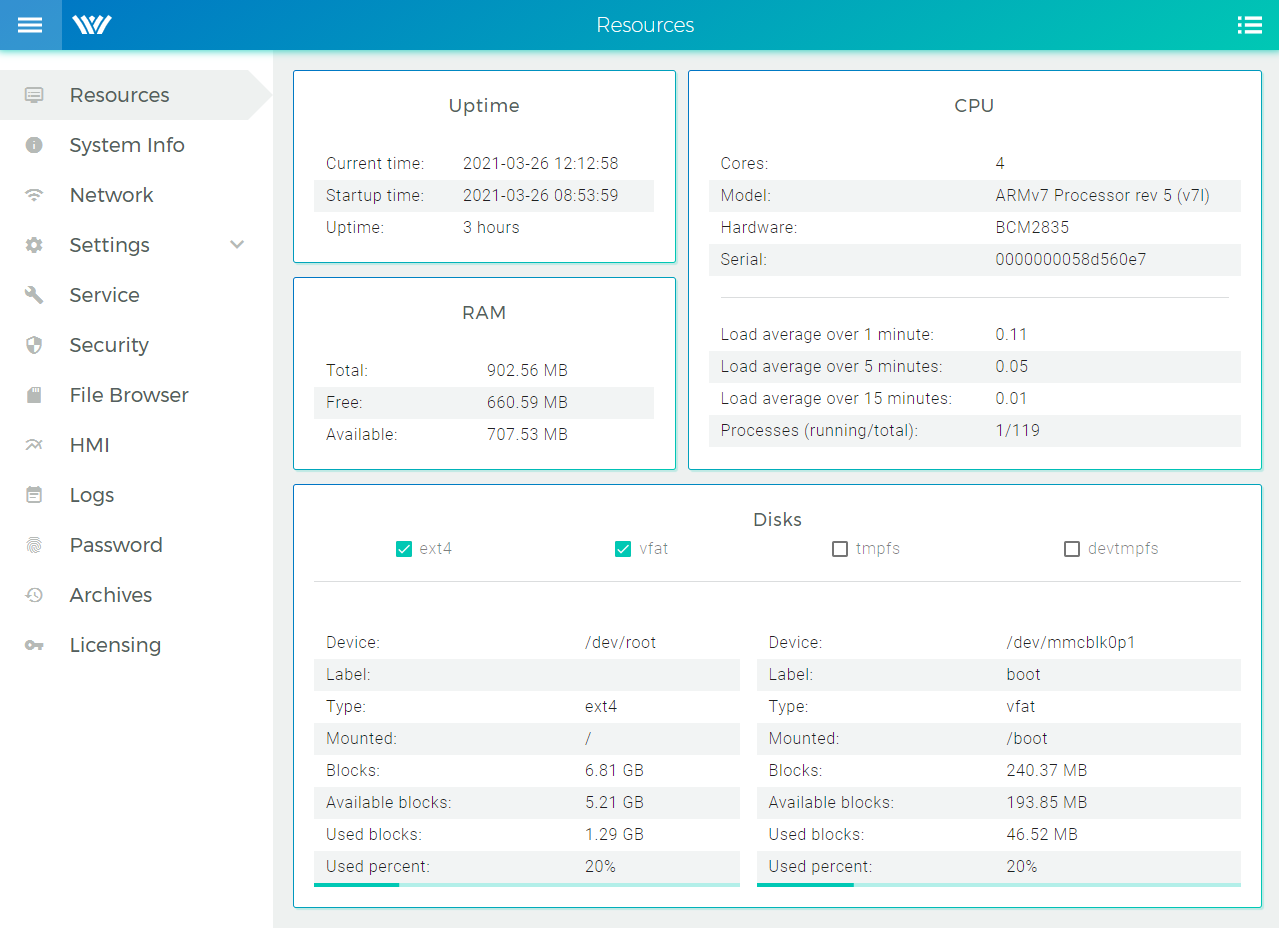
3.1 Resources
This section is for informational purposes only and shows:
- Uptime,
- CPU information,
- current RAM and CPU load,
- memory devices information and its current usage.
3.2 System Info
The System Info displays information about:
- currently running REXYGEN application,
- installed REXYGEN system,
- operating system.
3.3 Service
The Service tab allows user to Reboot or Shutdown the device. Other possibility is to Disable, Restart or Stop the RexCore service. The REXYGEN system log is also displayed in this tab.
3.4 Network
The Network tab shows information about currently set network interfaces and moreover one can reconfigure this interfaces in this tab.
3.5 Hostname
This section is dedicated to device Hostname configuration.
3.6 Date and Time
Date and Time settings can be configured here.
3.7 Security
This tab is useful when you want to upload certificate and private key to your device. There are shown information about SSL Certificate.
3.8 File Browser
A simple file manager is available on this tab, which allows you to work with the content of the specified file-system part. Default access rights settings can be changed in config.lua file. By default, the file browser has read access to the /rex/ directory and write access to the /rex/data directory. For more information see Chapter 5.
Note that uploading files to the device via the REXYGEN DWM is only possible to the /rex/data/upload folder. Upload is performed by Linux user www-data therefore when uploading to another folder the user www-data needs to have write permissions.
3.9 HMI
The HMI tab can be configured do display the Human Machine Interface of your REXYGEN project. For details, see the Section 4.2.
3.10 Logs
This section allows to searching and filtering the System log. The filter is set to show REXYGEN logs by default.
3.11 Password
Passwords for REXYGEN users can be changed here.
3.12 Archives
This section allows to searching and filtering the REXYGEN archives stored on the device. The RexArc have to be installed on the device.
3.13 Licensing
Use this tab for licensing your device. The licensing procedure should be described in detail in the Getting started manual for your specific device. The manual can be found at [1].
Chapter 4
REXYGEN DWM Configuration
The default REXYGEN DWM configuration will probably address most of the use cases considered. However for more advanced applications it is possible to configure the navigation menu and labels, show/hide menu item, reorder items, add user permissions. It is also possible to configure more instances of one class object, which is useful in some cases.
4.1 Menu Configuration
For modification edit config.js file on your target device:
Default config.js is configured as:
window.DWMConfig = {
    menus: [
        {
            class: 'system_resources'
        },
        {
            class: 'system_info'
        },
        {
            class: 'service'
        },
        {
            class: 'network_configuration'
        },
        {
            class: 'hostname'
        },
        {
            class: 'datetime'
        },
        {
            class: 'security'
        },
        {
            class: 'filebrowser'
        },
        /*{
            class: 'hmi'
        },*/
        {
            class: 'logs'
        },
        {
            class: 'password_change',
            superEnabled: false,
            adminEnabled: true,
            operatorEnabled: true,
            guestEnabled: true,
        },
        {
            class: 'archives'
        },
        {
            class: 'licensing'
        },
    ]
};
Note: The config.js.help file contains help and example of use.
4.1.1 General parameters
This parameters can be used for all screen types:
- {string} class – mandatory - class of the screen (possible choices: system_resources, system_info, basic_network_configuration, network_configuration, datetime, hostname, service, security, filebrowser, fileeditor, hmi, logs, dwm_config, rexcore_config, password_change, archives, event_log, licensing, rex-arc-view)
- {string} icon – optional - icon name from https://fonts.google.com/icons?selected=Material+Icons:home
- {boolean} visible – optional - if set to false, menu is hidden for everybody
- {string[]} acl – optional - list of users that can display the menu
- {boolean} default – optional - if set, the menu will be used to display default screen
- {string} menuLabel – optional - text that will be placed in the menu as a link to the page
- {string} screenHeader – optional - text that will be displayed on top of the page in header of the page
- {string} screenHtmlTitle – optional - text that will be displayed in the title of the page
- {object} queryParams – optional - query parameters to be given to the screen component (e.g. set queryParams: path: ’/rex/’ to class filebrowser), see Chapter 4.1.3 for details
- {object[]} menus – optional - inserting screens into the submenu
for example:
{
    icon: 'data_usage',
    menuLabel: 'MySubmenu',
    menus: [
    {
        class: 'datetime',
        acl: ["admin"],
        screenHeader: 'Custom header',
        screenHtmlTitle: 'Custom HTML title',
    },
    {
        class: 'hostname'
    }],
},
4.1.2 Parameters for specific classes
This parameters can be used only for specific classes:
- class hmi
- {string} group – optional - specifies to which HMI group this HMI page belongs
- class password_change
- {boolean} adminEnabled – optional - if set to true, the admin password can be changed
- {boolean} superEnabled – optional - if set to true, the super password can be changed
- {boolean} operatorEnabled – optional - if set to true, the operator password can be changed
- {boolean} guestEnabled – optional - if set to true, the guest password can be changed
- class event_log
- {string} archive – mandatory - archive name
- {object} export – optional - settings for archive export
- {string} delimiter – optional - pre-fill of delimiter type export settings
- {string} customHeader – optional - pre-fill of the custom header export settings
- {string} columnFilter – optional - pre-fill of the column filter export settings
- {string[]} tableHeader – optional - names of column headers (e.g. [’Timestamp’,’ID’,’Message’])
- {string} idsFilterLabel – optional - pre-fill the filter for the archive IDs (e.g. ’1,2’)
- {boolean} allowDeleting – optional - if set to true, the event log can be deleted
4.1.3 Possible queryParams for specific classes
- class hmi
- {boolean} hiddenTabs - tabs header display
- {string} id - id of the currently displayed HMI
- class filebrowser
- {string} path - directory path
- class fileeditor
- {string} path - directory path
- {string} file - file name
- class archives
- {string} arcName - pre-fill of the archive name
- {string} arcIDs - pre-fill of the archive IDs
- {string} since - pre-fill timestamp since
- {string} until - pre-fill timestamp until
- {string} delimiter - pre-fill of delimiter type export settings
- {string} columnFilter - pre-fill of the column filter export settings
- {string} columnHeader - pre-fill of the custom header export settings
- {number} numberOfItems - pre-fill of the max number of items (rows)
- {boolean} showData - data display option
- {boolean} showEvents - events display option
- {boolean} showLogs - logs display option
- {boolean} loadData - turn on automatic data retrieval after page loading
4.2 Integration of HMI pages
To allow HMI integration the hmi package needs to contain a manifest file hmi.json. To include the file in the compilation process of REXYGEN Studio put the file in the hmisrc folder. Example of the manifest file:
    [{
        "name": "index",
        "js": [
            "js/rex-ui-svg-general.js",
            "js/rex-ui-svg-home.js",
            "js/rex-ui-svg-hvac.js"
        ],
        "groups": ["group-port-a"]
    }, {
        "name": "configuration",
        "js": ["js/rex-ui-svg-general.js"],
        "groups": ["group-port-b"]
    }, {
        "name": "trends",
        "js": ["js/rex-ui-svg-general.js"]
    }]
- name – corresponds to the svg filename (without suffix .hmi.svg)
- js – list of used HMI libraries
- groups – specifies to which HMI group this HMI page belongs
When using HMI groups you need to configure the config.js file accordingly. E.g.:
    {
        class: 'hmi',
        menuLabel: 'Port A',
        queryParams: {hiddenTabs: false},
        group: 'group-port-a',
        screenHeader: 'Port page',
        screenHtmlTitle: 'Port page'
    },
    {
        class: 'hmi',
        menuLabel: 'Port B',
        queryParams: {hiddenTabs: true},
        group: 'group-port-b',
        screenHeader: 'Port page',
        screenHtmlTitle: 'Port page'
    },
Chapter 5
Access Rights Settings
Access to directories can be granted or removed by modification of the /rex/dwm/config.lua file. For security reasons, this file cannot be edited directly using REXYGEN DWM. Access to read the content of the directory can be granted with adding the directory path into the readable_path_filters list. Similarly, the rights to write to the directory can be granted by adding a path to the writable_path_filters list.
Default config.lua:
local config = {
    file_system = {
        readable_path_filters = {
            '/rex/'
        },
        writable_path_filters = {
            '/rex/data/'
        }
    }
}

return config
All read/write operations are performed as Linux user rex-dwm. To read and write using REXYGEN DWM, you first need to grant the necessary rights in the specified folder to that user. This is another layer of the security protection.
After modification of the /rex/dwm/config.lua file, it is necessary to restart the rex-dwm-rpc service with command:
service rexdwmrpc restart
List of Figures
Bibliography
[1] REX Controls s.r.o.. Internet webpage www.rexcontrols.com, 2024.
Documentation reference number: 17331
2025 © REX Controls s.r.o., www.rexygen.com